前言
接演上篇, 继续介绍Spring Cloud 相关的基础组件。 本篇我将用一个实际的Demo来记录一下如何使用 Spring Cloud 结合 Netflix Eureka 来实现服务发现的功能。
项目地址: spring-cloud-eureka-demo
在 Spring Cloud 这种分布式的架构中,如何找到对应机器的物理地址是一件至关重要的事情,这种行为又被称作服务发现。服务发现在分布式系统中十分重要,它赋予了程序快速水平伸缩的能力。 其次它还有助于提高程序的的弹性,当有服务不健康或不可用时,服务发现可以将坏掉的服务从服务列表中剔除,保证程序的可用性,将损害降低到最小。
在开始之前, 我们还需要解决四个问题,这些问题在服务发现的实现中大都存在。
1. 服务注册 - 服务如何使用服务发现代理进行注册?
2. 服务地址的客户端查找 - 服务客户端查找服务信息的方法是什么?
3. 信息共享 - 如何跨节点共享服务信息?
4 . 健康监测 - 服务如何将它的健康信息传回给服务代理发现?
下图详细的展示了如何解决这四个问题的流程
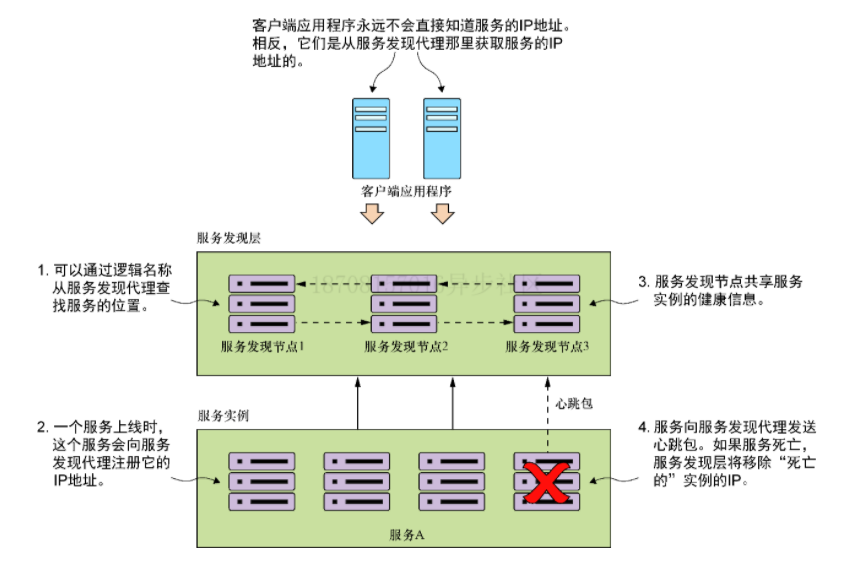
图片来自 spring microservices in action 一书
服务向服务发现代理进行注册后,这个服务就可以被需要使用它的其它服务所调用。但是上图的实现还存在一定的问题, 即客户端每次调用微服务实例时,服务发现代理就会被调用。这种方式可行但很脆弱,因为客户端完全依赖于服务发现代理来查找和调用服务实例。
一种更加健壮的方法是在客户端使用负载均衡,即将服务发现代理的注册表定期缓存到客户端本地,来减少对服务发现代理的调用,如下图所示:
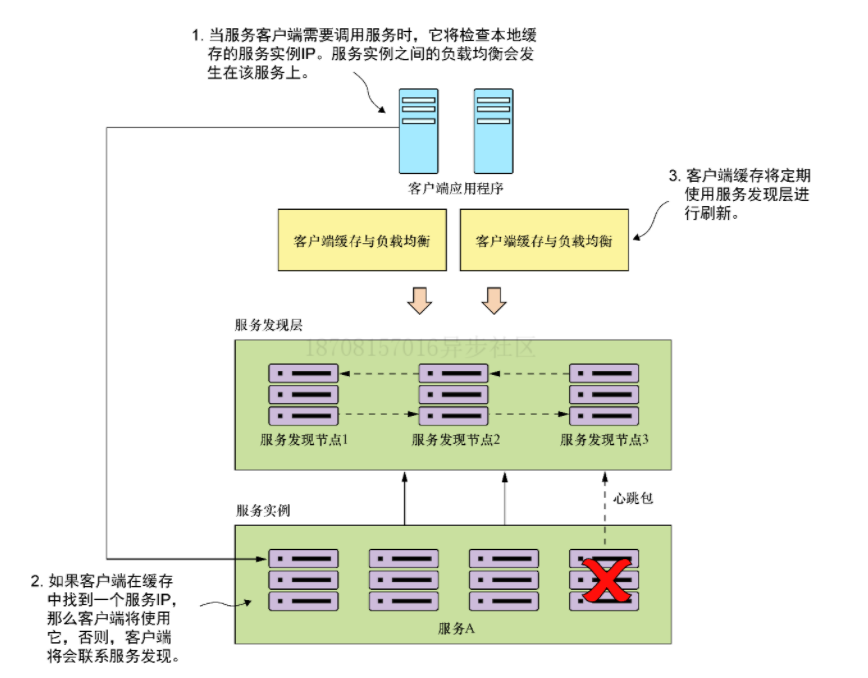
图片来自 spring microservices in action 一书
在这种方式中,客户端会定期缓存服务发现代理上的注册表信息到本地,如果在调用服务实例的过程中,服务调用失败,客户端将尝试从服务发现代理上重新获取并刷新本地缓存,这样就大大减轻了服务发现代理的压力, 提高程序的吞吐能力。
具体实现
有了 Spring Cloud 实现一个服务发现代理就变得十分简单,我们只需要通过 Spring Cloud 结合 Netflix Eureka 就可以轻松的搭建起一个服务发现代理。
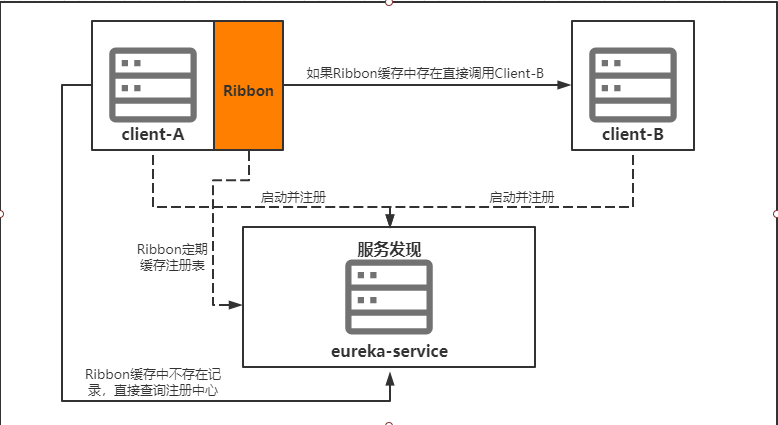
本例中包含三个项目,ClientA, ClientB, 以及服务发现代理 Eureka-Service。我将通过 Eureka 代理注册两个服务, 并通过 ClientA 调用 ClientB 并使用 Netflix 的 Ribbon 来实现客户端的负载均衡机制。
具体流程如下图:
1. 搭建 eureka-service
创建 Spring Boot 应用并加入相关依赖
<dependency>
  <groupId>org.springframework.cloud</groupId>
  <artifactId>spring-cloud-starter-netflix-eureka-server</artifactId>
</dependency>
在程序引导类上添加相应注解
@SpringBootApplication
@EnableEurekaServer
public class EurekaApplication {
    public static void main(String[] args) {
        SpringApplication.run(EurekaApplication.class, args);
    }
}
@EnableEurekaServer 注解标注此程序为 Eureka 注册中心
修改配置文件
application.yml
server:
  port: 7016

eureka:
  client:
    # 不对自身进行注册
    register-with-eureka: false
    # 不在本地缓存注册表信息
    fetch-registry: false
    service-url:
      # 配置注册中心地址
      defaultZone: http://localhost:7016/eureka/
  server:
    # 服务器接受请求之前等待的初始时间
    wait-time-in-ms-when-sync-empty: 0
bootstrap.yml
spring:
  application:
    name: eurekaservice
启动项目访问 http://127.0.0.1:7016 即可看到 Eureka 服务的首页
或通过接口请求 http://127.0.0.1:7016/eureka/apps 也可看到相应的服务信息
2. 搭建 client-A
创建 Spring Boot 应用并加入相关依赖
<dependency>
    <groupId>org.springframework.boot</groupId>
    <artifactId>spring-boot-starter-web</artifactId>
</dependency>

<dependency>
    <groupId>org.springframework.cloud</groupId>
    <artifactId>spring-cloud-starter-netflix-eureka-client</artifactId>
</dependency>

<dependency>
    <groupId>org.springframework.cloud</groupId>
    <artifactId>spring-cloud-starter-openfeign</artifactId>
</dependency>
在程序引导类上添加相应注解
@SpringBootApplication
@EnableEurekaClient
@EnableFeignClients
public class ClientAApplication {
    public static void main(String[] args) {
        SpringApplication.run(ClientAApplication.class, args);
    }
}
@EnableEurekaClient 注解标注此程序为 Eureka 注册中心
@EnableFeignClients 注解标注开启 Feign 客户端来调用服务
修改配置文件
application.yml
server:
  port: 7018
  servlet:
    context-path: /api/clienta

eureka:
  instance:
    # 注册服务的 IP 而不是名称
    prefer-ip-address: true
  client:
    # 注册自身到 eureka
    register-with-eureka: true
    # 在本地缓存注册表 每隔 30s 自动刷新服务
    fetch-registry: true
    service-url:
      # 配置注册中心地址
      defaultZone: http://localhost:7016/eureka/
bootstrap.yml
spring:
  application:
    name: clienta
使用 RestTemplate 请求服务
注入带有 Ribbon 缓存功能的 RestTemplate
webConfig
@LoadBalanced
@Bean
public RestTemplate restTemplate(RestTemplateBuilder builder) {
    return builder.build();
}
@LoadBalanced 注解将对RestTemplate改造, 使其支持Ribbon负载均衡。
ClientBRestTemplateClient
@Component
@AllArgsConstructor
@Slf4j
public class ClientBRestTemplateClient {

    private final RestTemplate restTemplate;

    /**
     * 查询 ClientB
     *
     * @return {@link Object} 机构
     * @author nza
     * @createTime 2021/3/4 15:57
     */
    public Object findClientB() {

        // 使用服务名称传递
        String uri = "http://clientb/api/clientb";

        // 使用网关传递
        ResponseEntity exchange = restTemplate.exchange(uri, HttpMethod.GET, null, Map.class);

        return exchange.getBody();
    }
}
使用 Netflix Feign 请求服务
ClientbFeignClient
@FeignClient("clientb")
public interface ClientbFeignClient {

    /**
     * 查询 clientB
     *
     * @author nza
     * @createTime 2021/3/23 15:29
     * @return    {@link java.util.Map}
     */
    @GetMapping(value = "/api/clientb", consumes = "application/json")
    Map findClientB();
}
这里只需要实现接口,通过使用 @FeignClient注解标注调用服务的名称,配合启动类的 @EnableFeignClients 就可以实现对目标服务的调用。
Client-B 就是个简单的 Sping Boot 项目,与 Client-A 差别不大,这里就不再赘述,具体代码可克隆下来自行查看。